Preparation is the key to a quality painting job. If you’re meticulous now, you’ll be able to sit back and enjoy a perfect finish once your job’s done. Here’re some expert tips.
Remove accumulated paint
Whether the paint that’s already on it is water-based or oil-based, wood trim usually looks best if the built-up paint is removed before you apply fresh paint.
- But, if the trim already has five or fewer coats of an oil-based paint, then you could probably get away with adding a fresh coat or two on top.
- This short cut won’t work for water-based paint, though.
- So if you’re planning on repainting trim that’s been painted with water-based paint, then you’ll have to sand or strip the old paint away before applying a new coat.
Strippers
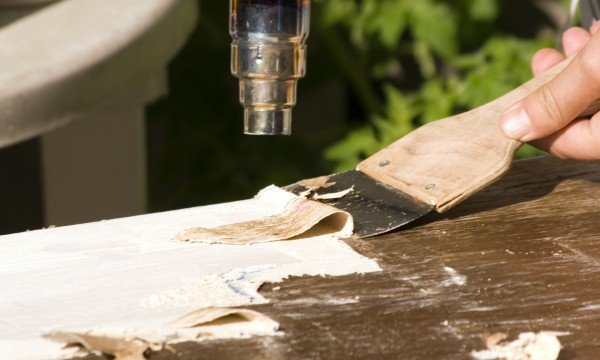
Chemical strippers come in many forms, but the best choice for vertical surfaces is a gel-type stripper that will cling to the surface.
- This way the chemical will have a longer time to work at stripping away the paint.
- If you don’t want to work with a gel-type paint stripper, you could try using some wallpaper paste to thicken a standard stripper.
- The golden rule when stripping paint with a blow torch or heat gun is to keep the tool moving.
- Too much heat on one spot will burn and char the paint rather than soften it.
- If you linger with your torch or gun, you also risk scorching the wood under the paint.
- After you’ve stripped a wooden surface be sure to seal up any knots. If unsealed, the resin from knots can seep through fresh paint.
- As a rule when repainting wood, it’s always a good idea to apply wood primer to the whole surface first.
- To contain blobs of paint and stripper as you clean your putty knife, use tin snips or a hacksaw to cut a vertical slot in the side of a large coffee can.
- The slot should be just a little deeper than the thickness of the putty knife’s blade, and just a little wider than its width.
- To clean, slide the putty knife down the slot, then pull it towards you, scraping the blade as you go. The residue will drop neatly into the can.
- To remove a rough section of built-up paint, try wrapping some leftover window screen (make sure that it’s metal, not fibreglass) around a piece of scrap wood.
- Use the wrapped wood like it’s a sanding block and it will remove paint quickly without damaging the surface.
- One way to preserve the definition of wooden mouldings while removing layers of old paint, is to work with a shave hook or homemade tools instead of sanding blocks.
- A small metal washer held between locking pliers, for example, is ideal for scraping concave sections.
- To finish this sort of finely detailed stripping job, wrap fine abrasive paper around a piece of wooden dowel and sand lightly up and down the grooves.
- You could also use an abrasive sponge block.
Keeping safe around lead-based paint
Any pre-1960s paintwork is likely to contain lead — but thankfully you can buy an inexpensive test kit from a DIY store to check any paint job that you’re thinking of working on.
If you do need to strip lead-based paint, there are some precautions that you must follow:
- Never use a blow torch, heat gun or sand paper, all of which produce lead-rich fumes and dust that are dangerous to inhale or ingest in any way.
- Instead, wear gloves and a dust mask for the stripping job and use a chemical paint stripper.
- Put any waste from your lead-based paint stripping job in a sealed bag immediately.
Keeping these expert tips in mind when you prepare a surface you want to repaint will help you do it smoothly the first time.